Lion's Mane and Comb Tooth mushrooms are cousin species within the Hericium group. They have the same preferences, planting instructions, and similar fruiting conditions and flavors. These mushrooms can be inoculated using the standard Drill-and-Fill Method or the Totem Method. Details for each are below. Maintaining and managing logs after planting is a matter of moisture management and patience. Before you begin, please be sure you have good quality logs to make the best possible Hericium experience. Follow the steps below for inoculating and managing your Hericium logs.
1. Cut the logs
Healthy, living trees should be cut during the dormant season and rested a minimum of 2 weeks prior to inoculating. This allows time for the tree's defense system to die back. Protect the logs from drying out by storing them low to the ground (but out of the soil and leaf layer), out of the sun and wind, and where they can receive natural rainfall. Logs can be rested until inoculation for longer than 2 weeks, however there is increased risk of contamination and losing vital log moisture beyond 6 weeks.
*Logs can be cut to size for either the Drill-and-Fill Inoculation Method using standard log sizes (3-8˝ diameter x 36-40˝ length) or the Totem Inoculation Method using larger diameter logs (6-12" diameter x 6-12" length).
NOTE: Logs can be cut to size for either the Drill-and-Fill Inoculation Method using standard log size (3-8" diameter x 36"-40" length) or the Totem Inoculation Method using larger diameter logs (6-12" diameter x 6-12" length).
Drill-and-Fill Method
2. Drill the holes
Drill the holes to a 1˝ depth following the diamond pattern (Figure below) for roughly 80 holes per log. Plug spawn requires 8.5mm (5/16˝) drill bit, and sawdust spawn typically requires 12mm (7/16˝) drill bit.

3. Inoculate, seal, and label
Plug Spawn: Use a hammer and gently tap in one plug per hole so it is flush with the surface of the log. Sawdust spawn: Break apart the spawn and inject in into each of the holes, typically with use of a tool.
Wax the holes as the logs are inoculated to protect the spawn and the log from drying out and reduce the risk of contamination. Be sure the hole is completely sealed. Waxing the ends of the logs is not necessary. Plug wax is an easy alternative to melting cheese wax and is easily applied using your finger as if you're applying lip balm over the end of the plug and hole opening. Hot wax is faster to apply and works better with sawdust spawn. Consider using wax daubers or the Okuda wax applicator. The flash point of cheese wax is 450°F. Do not overheat the wax! Turn down the heat if the wax begins to smoke. Consider labeling your logs using aluminum tags.
4. Incubate logs and manage for moisture
Once inoculated, place your logs in a shaded area, protected from the sun and wind, low to the ground or directly on the ground, and where they can receive natural rainfall. Maintaining moisture during this phase is the most critical step to mushroom production success. We recommend your logs receive 1˝ of rain per week. If it is dry, you may need to sprinkle your logs. Logs will produce mushrooms in the fall typically a full year after planting when the conditions for fruiting are ideal. Harvest mushrooms by twisting them off the log once the spines reach ¼˝. Store them in the refrigerator until you enjoy your bounty.
Difficulty:
Easy to moderate.
Time to plant:
Spring and fall.
Time to fruiting:
Variable depending on log size. Typically 1+ year after inoculation.
When they fruit:
Early summer through fall.
Logs grown on:
Beech, Sugar Maple, Red Maple, Hackberry, Mulberry, Aspen and more.
Plug spawn:
Approximately 80 plugs per log.
Sawdust spawn:
One bottle inoculates 5 logs for drill-and-fill or one totem. One 5 lb. bag inoculates 12-16 drill-and-fill logs or 6 totems.
Appearance:
Both mushrooms are creamy white colored. Lion's Mane develops into softball sized clusters, Comb Tooth into branching clusters. Hanging spines develop and elongate. Spore print: white.
Flavor and texture:
Shellfish flavored, soft and chewy texture.
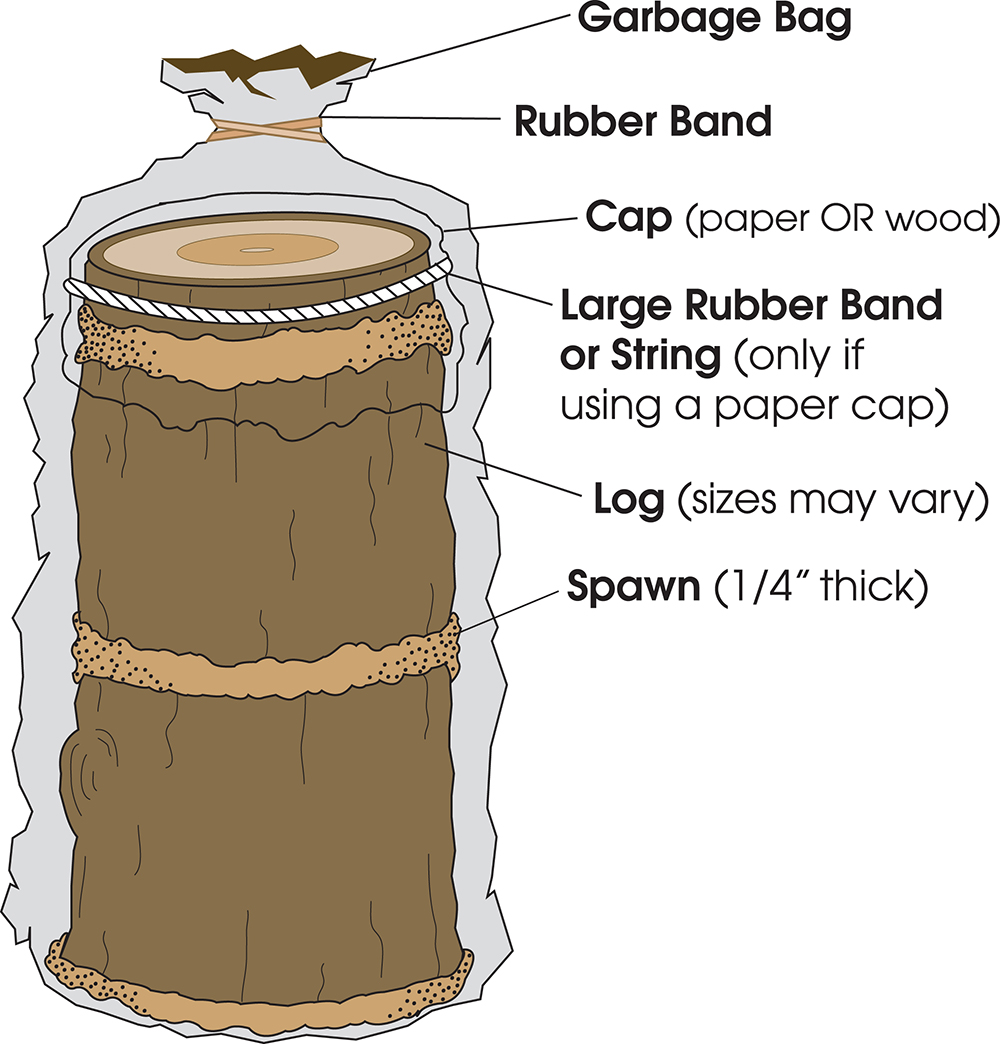
Totem Inoculation Method
1. Cut the logs
The same rules apply to cutting logs for the Totem Method they do for the Drill-and-Fill Method: healthy, living trees should be cut during the dormant season and rested a mini- mum of 2 weeks prior to inoculating. Protect the logs from drying out by storing them low to the ground (but out of the soil and leaf layer), out of the sun and wind, and where they can receive natural rainfall. Logs can be rested until inoculation for longer than 2 weeks, however, there is increased risk of contamination and loss of vital log moisture beyond 6 weeks. The Totem Method uses larger diameter logs that are 6-12" in diameter and cut in 6-12" lengths.
2. Inoculate and Incubate the logs
Place one to two cups of sawdust spawn in the bottom of a plastic garbage bag or large leaf bag. Set the log squarely on top of the spawn inside the bag (cut ends facing up and down). Sprinkle enough spawn on top of the log to cover it ⅛˝ to ¼˝deep. Set another log on top of this and sprinkle more spawn. Cover and cap the top log with newspaper or brown paper bag and secure it onto the log (large rubber bands work well for this). You can also use a thin slice of log to cap the top. Close up the bag with a small rubber band leaving a slight opening for air exchange. Ideally they should be placed in an area with constant temperature between 60-80°F for 4-6 months. Once the incubation phase is complete (you should see white fuzzy growth on the logs), remove them from the bag and place upright outdoors in a shady area where they are out of the wind and can receive natural rainfall. Mushrooms will typically fruit in the fall. Harvest as described in Step 4.
 Plug Spawn") $23.00–$46.00
$23.00–$46.00 Plug Spawn") $23.00–$46.00
$23.00–$46.00


