

Turkey Tail mushrooms are found in almost everyone's wooded neighborhood and are a powerful decomposer of stumps and logs. These beautiful mushrooms can also tolerate bright light and open forest conditions while fruiting, whereas most other mushroom varieties require shade. Turkey Tail could make a fine perennial addition to any decorative garden using logs or even a fresh stump. This strain is aggressive and promises to colonize quickly. Follow the six easy steps below for inoculating and managing your Turkey Tail logs.
AT A GLANCEFollow the six steps below for inoculating and managing your Turkey Tail logs.
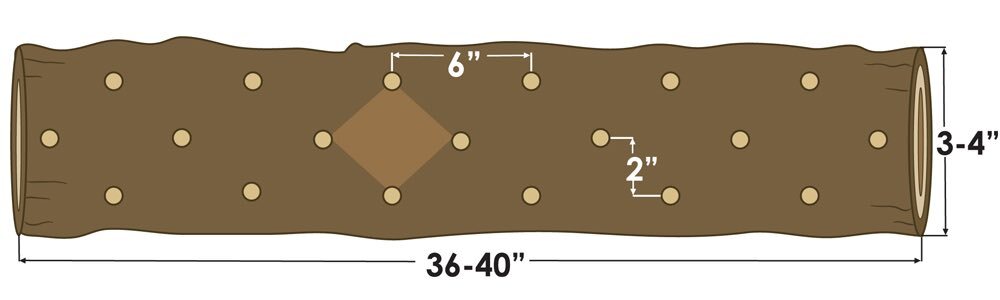
1. Cut the logs (3-8˝ diameter x 36-40˝ length)
Healthy, living trees should be cut during the dormant season and rested a minimum of 2 weeks prior to inoculating. Protect the logs from excessive drying out by storing them low to the ground (but out of the soil and leaf layer), out of the sun and wind, and where they can receive natural rainfall. Logs can be rested until inoculation for longer than 2 weeks, however there is increased risk of contamination and losing vital log moisture beyond 8 weeks.
2. Drill the holes
Drill the holes to a 1˝depth following the diamond pattern shown for roughly 50 holes per log. Plug spawn requires an 8.5mm (5/16˝) drill bit, and sawdust spawn typically requires a 12mm (7/16˝) drill bit. Drill all the way around the log.
3. Inoculate and seal with wax
Turkey Tail Plug Spawn: Use a hammer and gently tap in one plug per hole so it is flush with the surface of the log.
Turkey Tail Sawdust Spawn: Break apart the spawn and inject it into each of the holes, typically with the use of an inoculation tool.
Wax the holes as the logs are inoculated to protect the spawn from drying out and reduce the risk of contamination. Be sure the hole is completely sealed. Waxing the ends of the logs is not necessary. Sealing plug spawn with plug wax is an easy alternative to melting cheese wax and is easily applied using your finger as if you're applying lip balm over the end of the plug and hole opening. Hot wax is faster to apply and works better with sawdust spawn. Consider using wax daubers or the Okuda wax applicator. The flash point of cheese wax is 450°F. Do not overheat the wax! Turn down the heat if the wax begins to smoke.
4. Label the logs
Labeling logs with mushroom type and date inoculated can be very helpful - especially as you continue to build up your log inventory. We use aluminum tags (information is etched into the tag with a pen) or other labels, and staple them into the ends of the logs.
5. Incubate logs and manage for moisture
Once inoculated, place your logs in a shaded area, protected from the sun and wind, low to the ground or directly on the ground, and where they can receive natural rainfall. Maintaining moisture during this phase is the most critical step to mushroom production success. We recommend your logs receive 1˝ of rain per week. If it is dry, you may need to sprinkle your logs. Logs will produce mushrooms in the fall after planting when the conditions for fruiting are ideal.
6. Harvesting mushrooms
Turkey Tail mushrooms develop slowly throughout the growing season. Simply grab the mushroom, twist, and pull it off the log. Store your harvest in the refrigerator up to 14 days in a brown paper bag or other container. Turkey Tail mushrooms can also be dried or frozen for long term storage.