Table Top Farms are an incredible introduction into the world of fungi. They are available in several unique varieties (Shiitake, Oyster, Lion's Mane, Comb Tooth, Reishi, and Chestnut). All are fun and easy to grow. Follow the five steps below for setting up your Shiitake Table Top Farm.
Setting Up Your Table Top Farm:
1. Preparation and Setup
Remove the mushroom block from the box. The block will come wrapped in a secondary large, plastic bag. Remove the block from the secondary, larger plastic bag that will be used as a humidity tent- do not discard this bag as it is part of the kit. The block appearance varies, but it is often patchy dark brown and white, and may have dark liquid in the bottom of the bag. This is normal. Cut open the bag directly in contact with the block and remove the block over the kitchen sink to reduce any mess. Place the block on a plate or tray and drape the humidity tent over the block (Figure 1). You can use wooden skewers, butter knives, etc to provides space between the block and developing mushrooms if you wish, but the quality of the mushrooms will not differ between methods.
2. Fruiting Location
Your Table Top Farm is aptly named. It can be grown on your kitchen table, counter top, shelf, or any other surface that receives indirect sun or incandescent light. A grow light works equally well (at least 8 hours a day). Room temperature should be between 55-70°F.
3. Maintaining and Monitoring
Mushrooms require humidity to develop. Generally the relative humidity of a household is enough to provide an adequate growing environment, however your kit may need occasional misting if your household is dry (RH of 30% or less). Shiitake pins (young mushrooms) begin developing 4-7 days after set up (Figure 2).
4. Harvesting Mushrooms
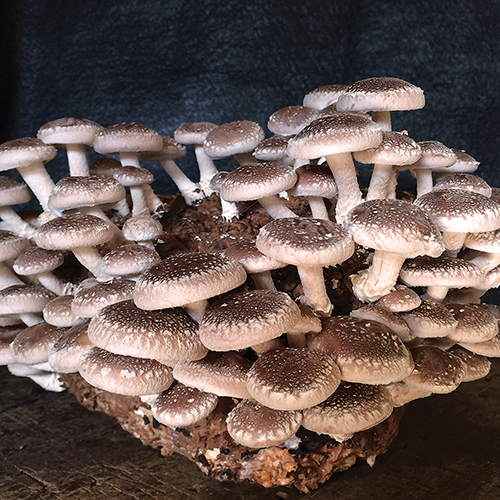
Monitor your farm closely as the mushrooms are developing. They grow very quickly, and it is best to pick them when the edges of the cap are still curled down (Figure 3). Use a scissors to cut the mushrooms off the block. Store your harvest in the refrigerator for up to 14 days in a brown paper bag in your refrigerator's crisper drawer.
5. Additional Fruiting
We only guarantee the first fruiting of this farm. Second and subsequent fruitings depend largely on the individual farm as well as the growing conditions provided. Follow the directions closely for best results.
After harvesting the mushrooms, remove the humidity tent and let the block rest for 1-3 weeks without watering. To stimulate another fruiting, fill a reservoir with cold water and soak the block for 6+ hours keeping it submerged with a brick or similar weight placed on the top of the block. Remove it from the water and set it up for fruiting again proceeding with Step 1 above. Shiitake yield will decline with each fruiting. The number of fruitings (typically 1-3) is dependent on many variables. If green molds develop on the block surface, add 2 capfuls of bleach per gallon of soak water. The bleach will evaporate quickly and cause no harm to you or the mushrooms. When you are finished with your block, it can be buried outdoors or tossed onto the compost pile for potentially more fruitings - eventually it will turn into rich compost.


