

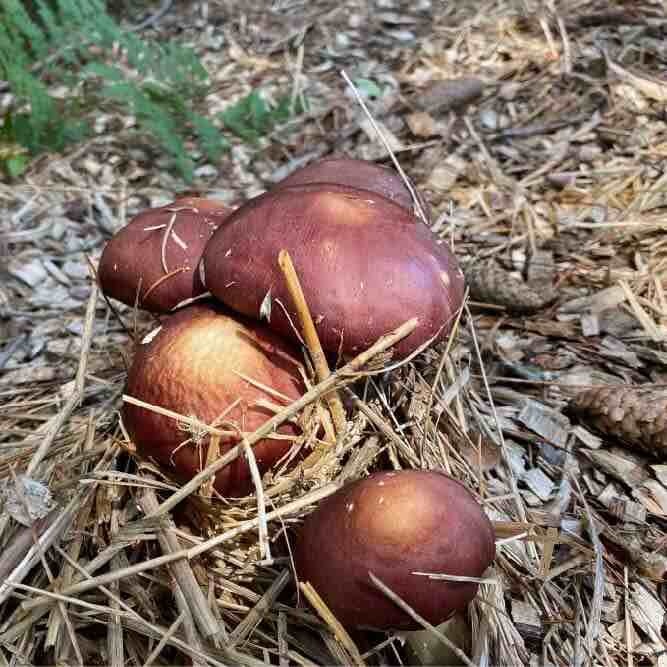
Spring and fall fruiting Wine Caps (Stropharia rugoso-annulata) claim both ends of summer as its normal fruiting time, and even fruits through the summer if there is plenty of rainfall. This past spring our Wine Cap season started at the end of May and the dark red buttons continued to push through the summer except for a few weeks in early August during our "dry" season. Most of these were harvested from straw beds we inoculated just the fall before.
Wine Caps like plenty of airflow for the spawn run phase which possibly is why it grows so well on bits and pieces of a dry matter like straw and chips instead of raw logs such as those used in shiitake cultivation. In fact, a combination of both chips and straw seems to be one of the best ways to grow them; giving a fast start with the looser straw component and longevity with the chip component. Layering the three ingredients (straw, spawn, chips) is quickly becoming our standard practice. For quickest fruiting, such as the following method given for a fall planted spring harvest, use only straw as your primary substrate.
Planning Your Wine Cap Mushroom Production
For market gardeners, reliability and consistency is particularly helpful when planning a crop. Fortunately, planting a straw bed this fall (usually by garlic planting time... often mid fall) will usually yield a nice crop in spring without the worries of beds drying out or overheating as can happen with spring planted straw beds. Wine Caps are well adapted for a fall planting because of its supreme hardiness and ability to grow in cool temperatures, thus out competing other fungi common in straw in warmer temperatures.
Steps for Building your Wine Cap Bed
1. Choose your location. You can get as strategic as you want; fully shaded areas will produce 2-3 weeks later, partially shaded areas will start fruiting earlier. Avoid grassy areas unless you lay wet cardboard down over the grass first to smother the grass. We like to lay out cardboard as we tend to have a lot of it, and this is a great way to return it to the earth! Avoid full sun as some warm, dry spring days can turn the succulent red capped mushrooms to dry leathery silver caps within hours. Partial shade is usually best; full shade in the south.
2. Gather your straw. We have used bales of straw left uncovered in the field for a year but it is better to use bright, clean, dry straw (oat, wheat, rye ... NOT hay!) that has been covered during storage. Older, uncovered straw tends to already have fungi established within the straw and it will compete with the Wine Cap Mushroom for resources. Keep in mind that fresh is best!
3. Purchase your Wine Cap spawn. While you can transfer spawn from old beds to this new bed, production is much greater if you use fresh spawn hungry for new organic matter. A 5 lb. bag of sawdust spawn will inoculate a small square bale (about 32 lbs.) spread out in a 5 ft. by 5 ft. area or about 25 sq ft.
5. Drain the water. After you drain away the water from the straw, spread out the straw into a 3-inch thick layer, and sprinkle with half of the spawn. Then add 3 more inches of straw, and sprinkle on the remaining half bag of spawn. Finally, add two inches of wood chips (any kind will do for this purpose!) to serve as a protective cap to keep the bed from drying out.
If you have wood chips and not straw, you can certainly inoculate this fall but you may not get mushrooms this coming spring, rather, a nice fruiting later in the summer. One thing to note- if you are planting a strictly wood chip bed it DOES matter what type of wood chips you use as it will be the main food source. We fall plant both wood chip beds, straw beds and combination beds of chips/straw/old sawdust to make sure we have Wine Cap mushrooms all season long.
6. Bed rejuvenation
Wine Cap mushrooms break down the bed substrate quickly. For this reason, straw beds usually only fruit for a single year. Wood chip beds may fruit up for to 3 years, but production will decline over time. When this begins to happen, you may try to rejuvenate your bed by feeding it new wood chips. Simply add several inches of chips to the top of your existing bed, ideally in spring or after a mushroom harvest. Bed rejuvenation is not a guarantee, but if the Wine Cap is still vigorous enough, it will begin to colonize the new materials and be ready for more fruiting several months later. Consider adding new spawn to the fresh materials for a much more successful approach.