Traditionally Oyster mushrooms are grown on smaller diameter logs (4-6˝) using the Drill-and-Fill Method, however, larger diameter logs can also be used to produce one of the best tasting specialty mushrooms available. Before you begin, please be sure you have good quality logs for the best possible growing experience. Follow the instructions below to use the "Totem Method," so named because you will stack the logs as if you were building a totem pole.
You will need:
• Freshly cut, living "soft" hardwood such as aspen, box elder, mulberry, poplar, etc. An individual bag of spawn will incoluate about 6 totems two pieces high (in total 12 log pieces). A Totem of Many Colors Kit will inoculate 9 totems (or 18 log pieces).
• 3 to 6 large black plastic bags, rubber bands, and possibly paper grocery bags or newspaper (see Step 2)
Planting your Oyster Totems
1. Cut the logs (8-12˝ diameter x 8-16˝ length)
Healthy, living trees should be cut during the dormant season. Oysters prefer "soft" hardwood species such as Cottonwood, Box Elder, Aspen, or Poplar but many other tree species will also produce. Try to make the cuts smooth and level, as this will aid stacking. Cut any branches off, so stubs are flush with the log. After cutting, logs should be rested a minimum of 2 weeks prior to inoculating. This allows time for the tree's defense system to die back. Protect the logs from drying out during this time by storing them low to the ground (but out of the soil and leaf layer), out of the sun and wind, and where they can receive natural rainfall. Logs can be rested until inoculation for longer than 2 weeks, however there is increased risk of contamination and losing vital log moisture beyond 6 weeks.
2. Inoculate the logs
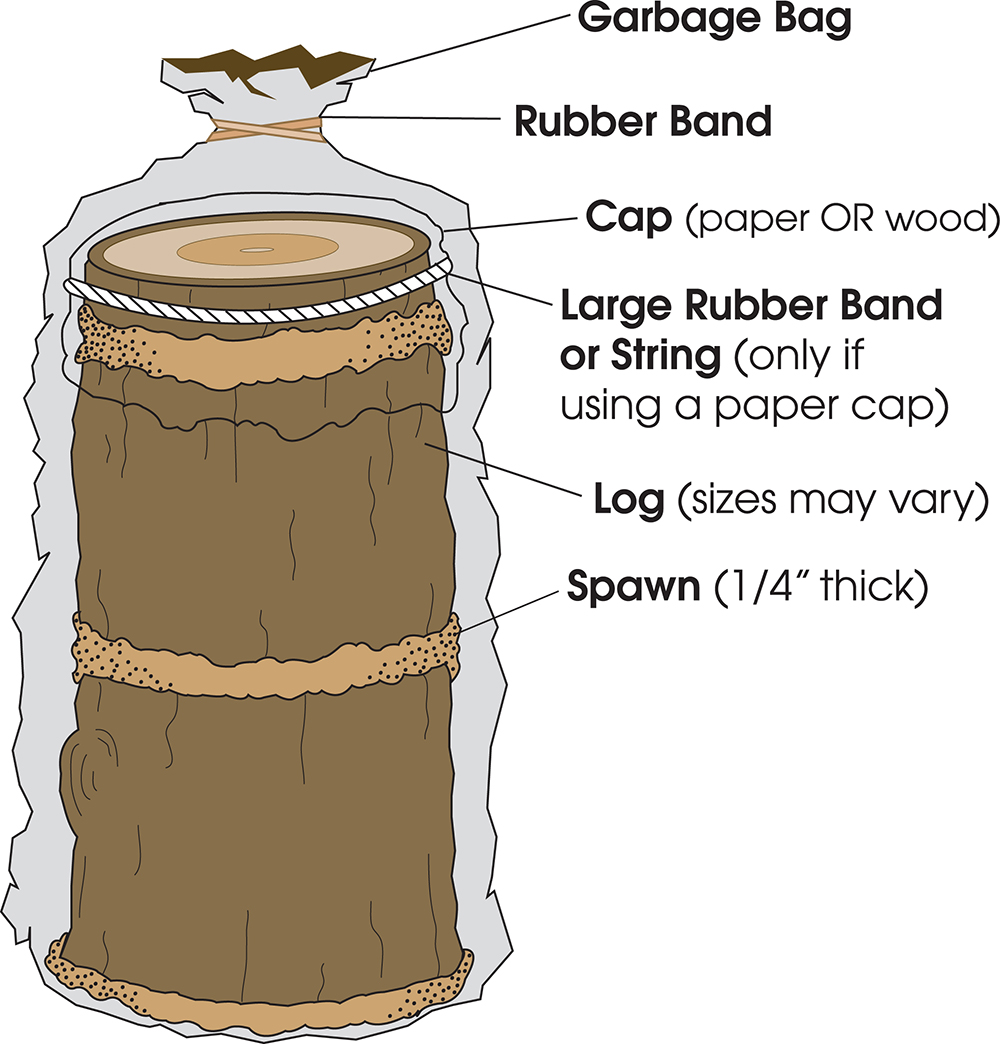
Gather all the materials in an area and wash your hands. You may wish to construct the totems in the location you intend to incubate them (Step 3) because they are cumbersome to move after inoculation. Take the bag of spawn and break it apart until it is crumbly. Place one cup of sawdust spawn in the bottom of a plastic garbage bag and spread it out into the shape of a pancake. Set the log directly on top of the spawn inside the bag (cut ends facing up and down). Make sure the end of the log has good contact with the spawn pancake in the bottom of the bag. Sprinkle more spawn on top of the log to cover it ⅛˝ to ¼˝ deep. Spread it out evenly over the top end of the log. Set a second log on top of this and be sure there is good contact with the spawn and the log stack is stable. Sprinkle more spawn on top of the second log and spread it out evenly to a depth of ⅛˝ to ¼˝. A third log can be stacked on top of this one following the above steps if the bag size allows. To protect the spawn on top from drying out, "cap" the totem by covering the top log with newspaper, brown paper, or a thin slice of log. If using paper materials as the cap, lay several paper layers over the top of the totem, bend them down the sides, and secure it in place (large rubber bands work well). Alternatively, a thin slice of log (1-3˝) can be firmly rested on top. Pull up the bag around the totem and close loosely with a small rubber band leaving a slight opening for air exchange. This bag creates an ideal humid space for the log to colonize. Repeat this process to construct additional totems with the remaining spawn. Do not mix Oyster varities! Each totem should be inoculated with only ONE of the varieties
3. Incubate the logs
Once planted, the Oyster mushroom will grow from the spawn layers into the ends of the logs. Keep the totems bagged and stored in an area between 60-80°F to allow growth. Some temperature fluctuation below this range is okay, but higher temperatures are dangerous as thermal death within the bag occurs over 100°F. Incubation can be done indoors any time of the year or outdoors in a sheltered location during the growing season. Remember, black plastic bags heat up quickly, so be sure to find a shaded location if you choose to incubate your totems outside. The totems typically require at least 4 months to colonize before they can be placed outside for fruiting.
Time to plant:
Year round with indoor incubation.
Time to fruiting:
4-12 months (larger diameter logs take longer than smaller diameter logs).
When they fruit:
Spring through fall depending on strain.
Logs grown on:
Soft hardwoods, ideally Cottonwood, Box Elder, Aspen, Willow, Mulberry, and Poplar.
Appearance:
Fan-like, oftern growing in clusters. Color differs based on variety.
Flavor and texture:
Tender, with a mild earthy flavor.
4. Selecting a fruiting area
Once the incubation phase is complete (often indicated by white fuzzy mycelium at least partially covering the log), remove the logs from the bag and place them upright outdoors. Be sure to select a shady area where they can receive rainfall. The more protected from wind and sun, the better, as mushrooms require high humidity to develop. Predicting when totems will fruit is difficult. Typically first fruiting occurs at 6 or more months (up to 12) after planting. Oyster mushrooms seem to develop spontaneously when conditions are right and especially after a heavy rainfall or change in temperature. Each of the varieties differ in natural fruiting temperatures. Consult the strain chart on our website for more information on when to expect your oyster variety to produce.
5. Harvest mushrooms
Watch you logs closely after they are placed for fruiting. Oyster mushrooms fruit spontaneously and quickly, and you do not want to miss them. Harvest mushrooms by twisting the cluster off of the log. It is best ot harvest when the edges of the caps are still curled down- mushroom quality and shelf life is better if you pick oysters young. If bugs and pests are problematic, cover the logs with a breathable barrier such as a floating row cover.
An alternative to using plastic
The plastic bag during incubation protects the logs and creates a warm, humid environment to support spawn growth and log colonization. Large thick paper feed bags, heavy cardboard boxes, or other materials fitted around the totem can also work. Bear in mind that log moisture and humidity around the totem during incubation is crucial to success, so these more breathable alternatives to plastic may require routine monitoring and watering.


