

Maitake, also known as Hen of the Woods, are incredibly flavorful, and often highly sought after by fall foragers - found around the base of Oak trees. These mushrooms are slightly parasitic to their host tree in nature and therefore require a different planting strategy than most other log-grown cultivars. To grow these beauties, the log must first be treated by pressure cooking, steaming, or boiling. This extra step is well worth it though, as logs can fruit for 7 years and counting. Follow the six steps below for preparing and planting your logs.
AT A GLANCEMaitake Planting Timline:
Late fall through early spring → cut oak logs
March through April → pre-treat logs and inoculate
Through June → incubate logs indoors
By end of June/early July → bury logs outdoors
Fall, anywhere from 3 to 18 months after burial → fruiting
1. Cut the logs
Maitake grows almost exclusively on Oak species. Cut healthy, living trees or branches for Maitake cultivation. Diseased trees or logs that fell a long time ago do not work well. Field and Forest Products offers kits that include heat-resistant autoclavable bags that are designed to tolerate the heat treatments described in Step 2 below. Cut the logs to a size that will fit comfortably in the bag, usually around 8˝x8˝x11˝. Avoid pieces that weigh less than 2 lbs. You will also need to know the size of the pressure cooker, steamer, or boiling vessel that will be used to treat the logs and make sure your bagged logs will easily fit inside. Installation of the breathable foam plugs and collars provided with the kit satisfy the necessary airflow requirements needed to get your Maitake logs off to a happy start.
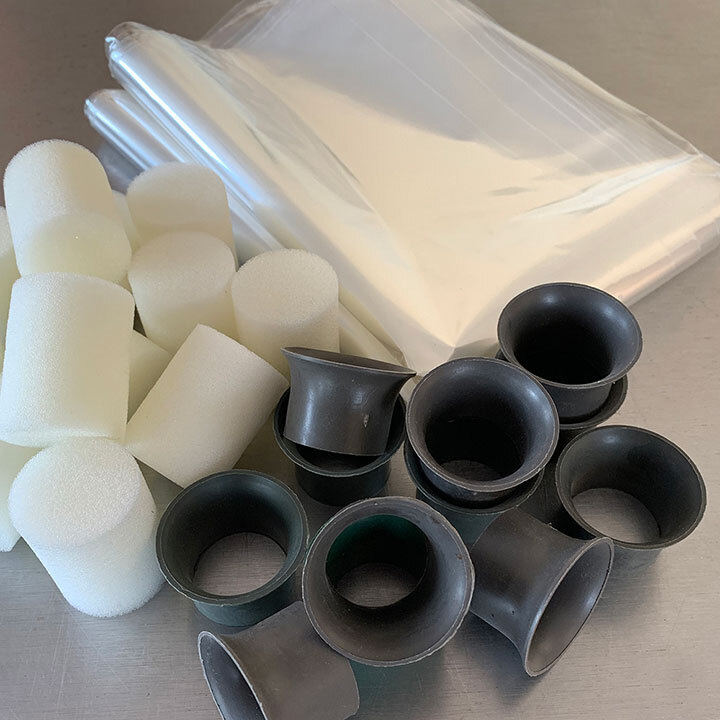
FIGURE 1: Log setup for treatment.
2. Treat the logs
There are three methods to treating log segments. For each method, place each log section upright into an autoclavable bag and push the entire opening of the bag up through the plastic collar and insert the foam plug (Figure 1). Note: If space is limited you can tie the bag shut on top with string and install the collar and foam plug after pretreating. You may have a length of extra bag that will have to be secured so that it does not obstruct the pressure valve/vent pipe. Tuck the extra plastic from above the plastic collar back down to the sides of the log and secure by tying string around the excess bag and log. Follow the procedures below for each method. After treatment, allow the log to cool before proceeding to Step 3.
A. Sterilizing (Pressure Cooking): This is the most effective treatment. Place the bagged log into the pressure cooker. Avoid having any plastic touch the canner's surfaces except where the log rests on the canner's rack. Add enough water to achieve a 60 minute cook. Sterilize at 10-15 psi for 60 minutes. We recommend filling the pressure cooker no more than 1/3rd way up the sides - usually 4-6 cups of water for a 8-10 inch diameter log is sufficient. Important: Always read your pressure cooker manual for operation instructions as pressure cookers vary in design and function.
B. Steaming: Place the bagged log into the steamer. Steam the log for at least 3 hours, and let cool with the lid on the canner. Contamination rate is lowest when steamed for 6 hours. Make sure to place the log on a rack or a few blocks of wood so that the plastic bag is not in constant contact with the pot bottom.C. Boiling: Place the bagged log in a large pot and maintain a low rolling boil for 1 hour. Remove hot log when it is safe to handle and finish cooling in a clean and undisturbed area.

FIGURE 2: Inoculated log with spawn on both cut ends of the log.
3. Inoculate
Once the logs are cool, they are ready to inoculate. Clean the inoculation area and spawn bag well and limit air movement to reduce the risk of contamination during inoculation. Break apart the sawdust spawn by kneading the bag. Cut open the spawn bag, remove the collar and foam plug from the bagged log, and pour in 1 to 1½ cups of spawn. Replace the collar and foam plug quickly, then manipulate and jiggle the spawn around so that the top and bottom (cut ends) of the log are coated with spawn (Figure 2).
4. Incubate
Place the log in an area at room temperature (55-70°F ideally) to incubate for 2-3 months. The spawn will spread out across the surface of the log, creating a white coating that will eventually develop orange rust-colored patches as the log becomes colonized (see Figure 3). After 2-3 months, the log should be mostly covered in mycelium and ready to bury outside. Green mold contaminants may also develop, but they are only a nuisance and should not influence the Maitake.

FIGURE 3: Fully colonized log ready to be planted.
5. Bury the logs
After incubation, remove the log from the bag and bury it vertically in a shaded spot outdoors so the top of the log is one inch below the soil surface. Mark the location of the buried log.
6. Mushroom harvest
Maitake mushrooms fruit in late summer and fall anywhere from 3 months to 2 years after burying. Maitake logs can fruit for more than 7 years, so continuously check your logs year after year. To harvest, simply pull and twist mushrooms off when the fronds grow to 1-2 inches long. Store in the refrigerator until they can be enjoyed.