Mushroom Log Inoculation Tool Use & Care
How to Use
First, thoroughly break up sawdust spawn inside of its original bag. Pour the spawn into a sturdy container (ice cream pails work great). To load sawdust spawn into the inoculation tool, jab it down into the loose spawn several times. Place the end of the tool above an inoculation site and push down on the top of the tool. The thumb style tool, with its light duty spring, requires a soft push. The palm style tool, with a much heavier spring, will require a forceful hit with an open palm. The spawn will slide out of the tool and into the hole. With practice you will know when the tool is full enough. Using your finger, check your inoculation sites when you first begin and also periodically to be sure the spawn is packed firmly into the hole. If there is too much empty space, top off the site with more spawn. If the hole is too tightly packed and overflowing with spawn, simply brush away the excess.
Maintenance
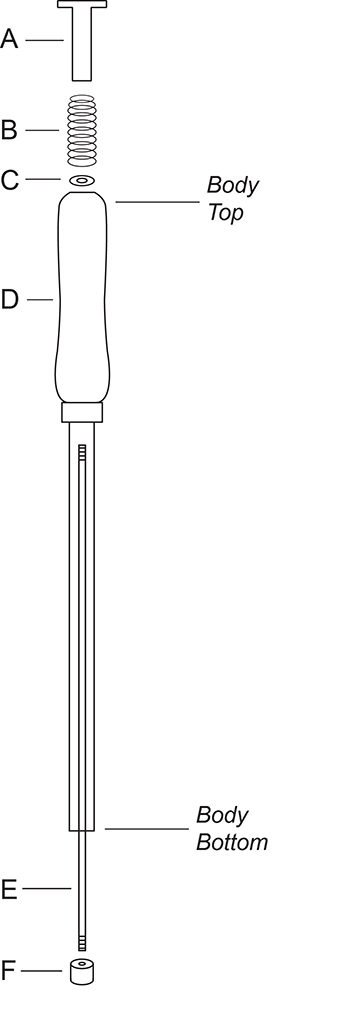
Periodically check the tip (F) and head (A) of the tool to make sure they are not coming unscrewed. An indication that the tip is coming loose is that spawn is being packed ≥ ⅛˝ below the bark surface. If the tip or head fall off, the internal pieces will fall out and the tool will have to be put back together. If this happens, refer to the diagram on the right and the instructions below for proper reassembly. The tool can be tightened by using a large flat head screwdriver. Insert the screwdriver into the groove on the tip, hold onto the head and lightly twist the screwdriver until tight.
Over time the tool may feel sticky. Spawn residue can build up inside the body. To prevent this or fix once it has become a problem, soak the tool in hot soapy water. Push down on the head of the tool a few times to loosen any debris. A more extensive cleaning can be achieved if the tool is taken apart and cleaned. To take apart, unscrew the tip and remove the internal pieces. Some of these parts are small so take care not to lose any. If parts are lost or need to be replaced, repair kits are available for purchase. You can see this visually by watching our video How to Clean and Care for your Inoculation Tool.
Assembly
There are six parts to an inoculation tool. The head (A), spring (B), washer (C), body (D), rod (E), and tip (F). You will need all of these parts for the tool to function properly. Hold the body (D) vertically with the wood handle on top. Balance the washer (C) over the hole on top. This washer will need to be pushed down the center of the body approximately 2.5 inches down. A small groove inside will prevent it from going any further than that. A hammer and center punch tool or screwdriver can be used to lightly tap the washer down into the body. Be sure to work on a flat, sturdy surface. Next, drop the spring (B) down into the top of the body, but make sure the pinched end of the spring faces up. Set the body down on the working surface. Screw the tip (F) onto one end of the rod (E). Push the other end of the rod through the body and up through the center of the washer and spring from the body bottom to the body top (see diagram). This can be tricky, but keep trying, you can do this. Be careful not to tilt the tool too much or the spring will fall out. Now, hold the tool in a horizontal position. Place a flat head screwdriver through the body bottom and into the groove of the tip (F). Insert the head (A) into the body top so it pushes against the spring. The head needs to be screwed onto the other end of the rod (E). Pushing the head and the tip while twisting will accomplish this task. Once secure, your tool is ready to use.