Growing mushrooms is a fun and unique experience. With this kit, discover the fascination with fungi and create your own Oyster mushroom rolls that will be ready to fruit in only 4-6 weeks. Follow the nine steps below for planting Oyster mushrooms on toilet paper rolls.
You will need:
Rolls of plain toilet paper - the less processed, the better, no scents, prints, or colors
Rolls needed: Small kit - 7, Large kit- 15, Mushrooms of Many Colors kit - 21
A kettle of boiling water, tongs, and a baking rack (optional)
Planting Your TeePee™ Rolls
Step 1.
Fill a large pan (one used to boil pasta is ideal) with water and bring it to a boil. Meanwhile, thoroughly clean your work surface. Unwrap the toilet paper rolls if they are individually wrapped.
Step 2.
When the water comes to a boil, remove the pot from the heat and dip the
toilet paper rolls (Figure 1), one at a time into the water until they become fully
saturated. Remove from the water (kitchen tongs are very helpful) and place them on
the counter or a cooling rack to drain.
Step 3.
Let the rolls drain and cool (Figure 2). When visible steam no longer rises
from the roll, test the temperature by feeling inside the paper tube with clean hands.
If it is comfortable to the touch, transfer the rolls into individual filter patch bags
provided.
Step 4.
Shake or massage the bag of grain spawn until most of the grains have
separated from each other. Cut a corner off the top of the bag and carefully pour
the spawn into the center tube of the toilet roll. Fill the tube completely, then
close the bag with a rubber band making sure the closure is above the filter patch
(Figure 3). Repeat for all the rolls. (Note: if you are in a hurry for results, remove the
cardboard tube and discard. The center may collapse a bit making inoculation more
cumbersome, but you will get faster fruiting by at least a few days.)
Step 5.
Place the bagged rolls in an undisturbed area where the temperature is between 65-75°F. The oyster
mushroom will quickly begin growing from the grains onto the toilet paper roll. We call this the incubation period.
Step 6.
Within 3 weeks, the rolls should be covered with white, fluffy mushroom mycelium. Occasionally you
might see a small patch of green. This is okay as long as the patch remains small. Let the fungus grow and continue
incubating for another 1-3 weeks. The longer you wait, the faster the roll will be to fruit mushrooms.
Step 7.
Place the bagged, incubated roll in the refrigerator for 48 hours to stimulate fruiting. You can keep the rolls
in the refrigerator (up to 6 months) to save them for fruiting at a later date. They will continue to grow, but very
slowly. Commence with Step 8 when you are ready to fruit them. Do not freeze the rolls.
Step 8.
Remove the bags of rolls from the refrigerator and place in a well-lit room at room temperature. Remove
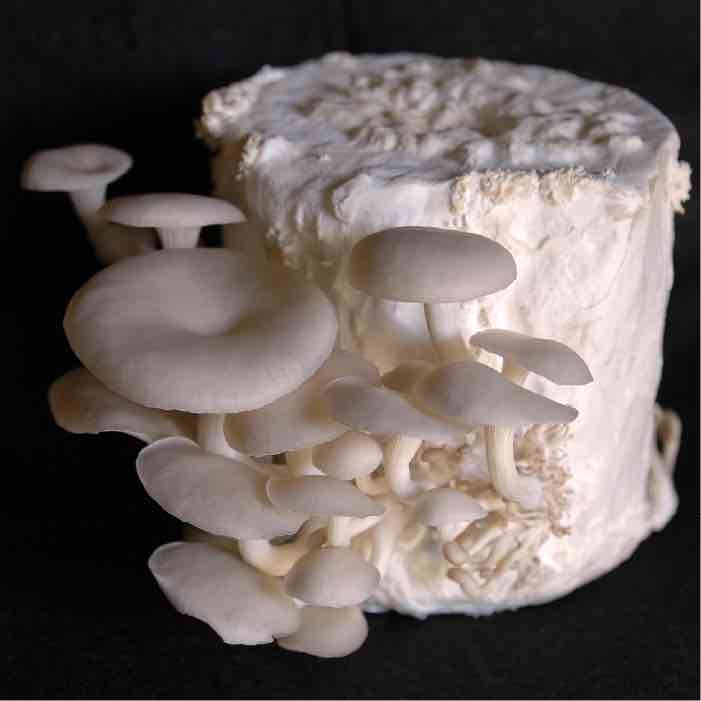
the rubber band from the bag and fluff it open to increase air flow into the bag. This change in temperature and. fresh air will trigger mushroom fruiting. Water lightly each day with a spray bottle, but make sure excess amounts of water are not pooling at the bottom of the bag. In 7-14 days you should see small mushrooms form that grow quickly into clusters ready to harvest. To harvest, simply grab the stem and twist them off, or cut at the base. They are best harvested when the edges of the mushroom caps are still curled down (Figure 4). Over mature mushrooms release their spores and do not store as long. Monitor the growing mushrooms and spray lightly with water if the caps appear leathery or seem to be shriveling.
Step 9.
After harvesting, spray the roll once more with water (if the roll looks dry), close up the bag with a rubber
band and let it rest for 2 weeks in an undisturbed area. Repeat Steps 7-9 until you exhaust the roll, then toss it onto the compost pile.


