Reishi is one of the most notable of medicinal mushrooms. Throughout ancient times, Reishi was believed to prolong life. Today, tea made from Reishi is still used as a remedy for dozens of ailments and to restore youth. Recent work indicates that the medicinal strength of this mushroom lies in its ability to bolster the immune system. This powerful medicinal can be grown on sawdust blocks (Table Top Farms, Ready-to-Fruit blocks) or naturally on logs using sawdust spawn or plug spawn. Follow the six steps below for inoculating and managing your Reishi logs.
Follow the six steps below for inoculating and managing your Reishi logs.
1. Cut the logs
Healthy, living trees should be cut during the dormant season and rested a minimum of 2 weeks prior to inoculating. This allows time for the tree's defense system to die back. Protect the logs from drying out by storing them low to the ground (but out of the soil and leaf layer), out of the sun and wind, and where they can receive natural rainfall. Logs can be rested until inoculation for longer than 2 weeks, however there is increased risk of contamination and losing vital log moisture beyond 6 weeks.
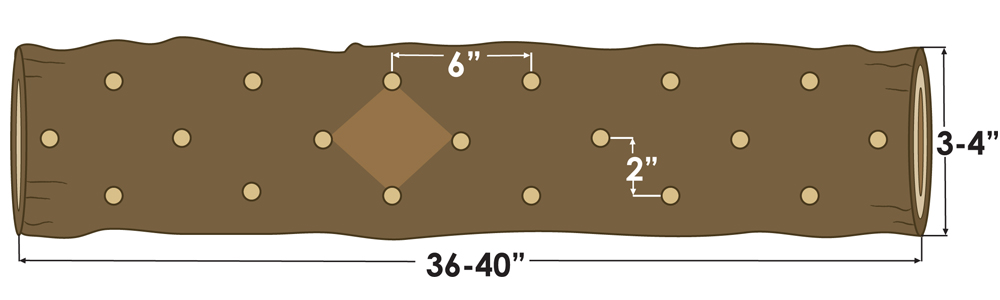
NOTE: Logs can be cut to size for either the Drill-and-Fill Inoculation Method using standard log size (3-8" diameter x 36"-40" length) or the Totem Inoculation Method using larger diameter logs (6-12" diameter x 6-12" length).
Drill-and-Fill Method
2. Drill the holes
Drill the holes to a 1˝depth following the diamond pattern for roughly 50 holes per log. Plug spawn requires a 8.5mm (5/16˝) drill bit, and sawdust spawn typically requires a 12.5mm (7/16˝) drill bit.
3. Inoculate and seal with wax
Plug spawn: Use a hammer and gently tap in one plug per hole so it is flush with the surface of the log. Seal each plug with melted wax or plug wax.
Sawdust spawn: Break apart the spawn and inject it into each of the holes, typically with the use of an inoculation tool.
Wax the holes as the logs are inoculated to protect the spawn from drying out and reduce the risk of contamination. Be sure the hole is completely sealed. Waxing the ends of the logs is not necessary. Sealing plug spawn with plug wax is an easy alternative to melting cheese wax and is easily applied using your finger as if you're applying lip balm over the end of the plug and hole opening. Hot wax is faster to apply and works better with sawdust spawn. Consider using wax daubers or the Okuda wax applicator. The flash point of cheese wax is 450°F. Do not overheat the wax! Turn down the heat if the wax begins to smoke.
4. Label the logs
Labeling logs with mushroom type and date inoculated can be very helpful - especially as you continue to build up your log inventory. We use aluminum tags (information is etched into the tag with a pen) or other labels, and staple them into the ends of the logs.
5. Incubate logs and manage for moisture
Once inoculated, place your logs in a shaded area directly on the ground, protected from the sun and wind, and where they can receive natural rainfall. Maintaining moisture during this phase is the most critical step to mushroom production success. We recommend your logs receive 1˝ of rain per week. If it is dry, you may need to irrigate. Reishi mushrooms develop best in warm humid conditions typically the summer a full year after planting. Growers in the north (with short seasons and low humidity) must consider managing logs in a shaded greenhouse, cold frame, or other season extension structure that can mimic the warm humid climate this southern species thrives best in. If maintaining humidity during the prolonged fruiting period is a concern, consider laying logs directly on the ground or even partially burying them.
6. Harvest mushrooms
Reishi can be harvested in either the antler stage, or the fully developed conch stage (this is more challenging to achieve in the northern region). Cut the mushroom at the base of the stem where it is attached to the log. Reishi mushrooms can be stored fresh in the refrigerator for several weeks or dried to extend the shelf life prior to using for teas or tinctures.
Geography:
Best grown in zone 6 or above for proper fruit development.
Time to plant:
Typically spring, but throughout growing season.
Time to fruiting:
Plug spawn: 15-18 months, Sawdust spawn: 9-12 months, (larger diameter logs will take longer than smaller diameter logs).
When they fruit:
Early to mid-summer in the South, mid-August in the North. Protect developing mushrooms when nights fall below 60°F.
Logs grown on:
Ideally Sugar Maple, Sweet Gum, Red Maple, Silver Maple, or Oak.
Number of logs:
Depends on log size (ideal is 4˝ diameter x 36-40˝ long). Plug spawn: approximately 50 plugs per log. Sawdust spawn: 20-25 logs (5 lb. bag).
Appearance:
Develops initially as slender stalks (antlers) that turn a deep red-rusty brown with bright yellow and tan at the growing tip. Fully mature mushrooms will flatten out and develop into a fan shape (conch) with creamy white and yellow edges, yellow underneath.
Mushroom use:
This medicinal mushroom is woody and tough. It is used in teas and tinctures.
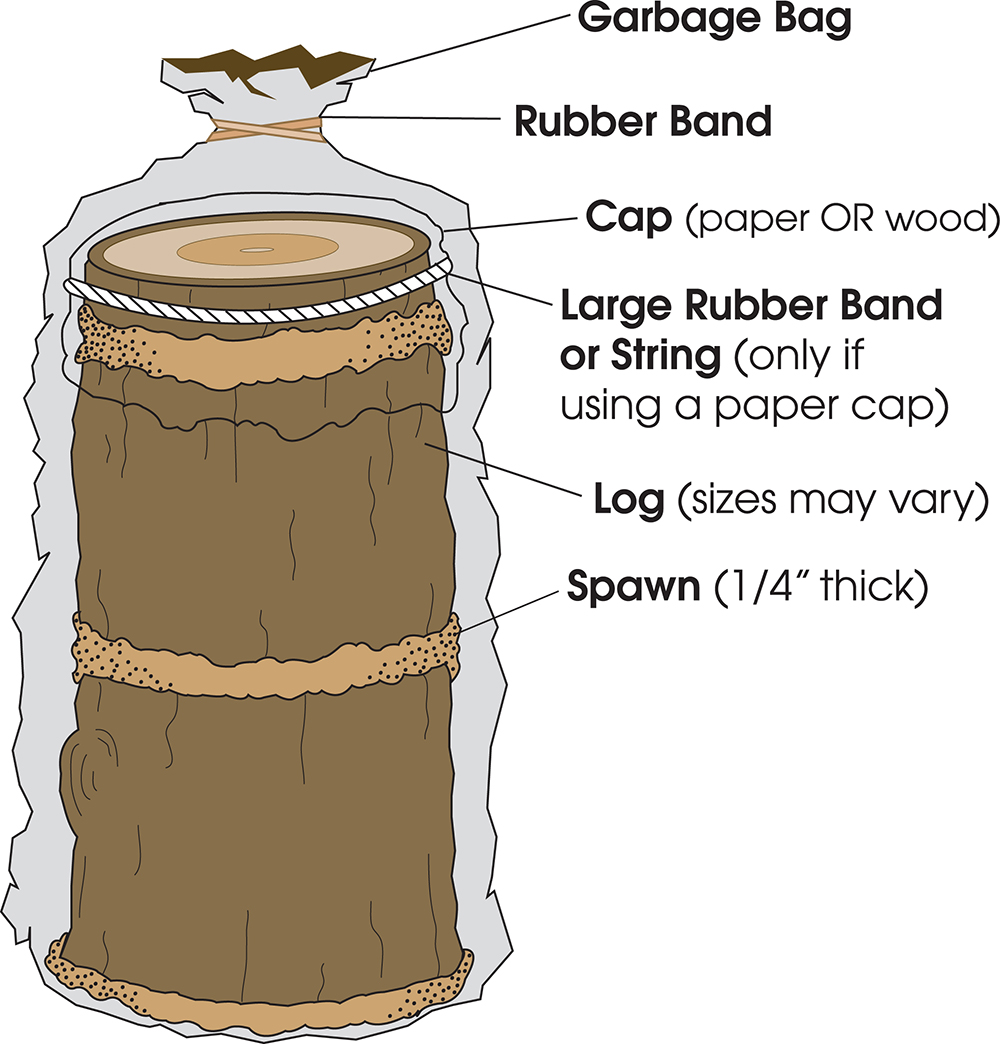
Totem Inoculation Method
Larger diameter logs can be stacked vertically and inoculated with sawdust spawn following the Totem Method. You may wish to construct the totems in the location you intend to incubate them because they are cumbersome to move after inoculation. Take one bag of spawn and break it apart until it is crumbly. Place one cup of sawdust spawn in the bottom of a plastic garbage bag and spread it out into the shape of a pancake. Set the log directly on top of the spawn inside the bag (cut ends facing up and down). Make sure the end of the log has good contact with the spawn pancake in the bottom of the bag. Sprinkle more spawn on top of the log to cover it ⅛˝ to ¼˝ deep. Spread it out evenly over the top end of the log. Set a second log on top of this and be sure there is good contact with the spawn and the log stack is stable. Sprinkle more spawn on top of the second log and spread it out evenly to a depth of ⅛˝ to ¼˝. A third log can be stacked on top of this one following the above steps if the bag size allows. To protect the spawn on top from drying out, "cap" the totem by covering the top log with newspaper, brown paper, or a thin slice of log. If using paper materials as the cap, lay several paper layers over the top of the totem, bend them down the sides, and secure it in place (large rubber bands work well). Alternatively, a thin slice of log (1-3˝) can be firmly rested on top. Pull up the bag around the totem and close loosely with a small rubber band leaving a slight opening for air exchange. This bag creates an ideal humid space for the log to colonize. Once planted, the Reishi mushroom will grow from the spawn layers into the ends of the logs. Keep the totems bagged and stored in an area between 60-80˚F to allow growth. Some temperature fluctuation below this range is okay, but higher temperatures are dangerous as thermal death within the bag occurs over 100°F. Incubation can be done indoors or outdoors in a sheltered location. Remember, black plastic bags heat up quickly, so be sure to find a shaded location if you choose to incubate your totems outside. The totems typically require 4 months to grow, but longer incubation is fine.
Once the incubation phase is complete, remove the logs from the bag and place individual log sections upright outdoors in a shady area where they can receive rainfall. Reishi develop slowly and require warmth and humid conditions throughout the growing period to fully develop. If maintaining humidity during the prolonged fruiting period is a concern, consider mulching in the fruiting logs or even partially burying them. Logs can also be fruited indoors between 70-80°F, at 75-80% relative humidity with gentle air movement and 12 hour per day of bright light. Harvest as described in Step 6.
 Plug Spawn") $23.00–$46.00
$23.00–$46.00


